How to manage and view generated invoices
In this guide, you’ll be shown how to use the Invoice Preparation dashboard in the Billing menu. After reading this guide, you’ll be able to manage and view invoices that have been generated by invoice scheduling and be able to credit invoices.
Note! The actions discussed in this guide are exception actions i.e., crediting an invoice, making a correction to an invoice, editing an unsent invoice, or sending invoices when automatic sending is not enabled. You can learn more about Invoice Scheduling from the Invoice Scheduling user guide.
Required User Rights
To be able to use the operations in this guide, you’ll possibly need the following user rights:
3505 Menu - Invoice Preparation, 3000 - Menu - Invoice List, 3523 Menu - Invoice Preparation - Delete invoice, 3524 Menu - Invoice Preparation - Release Tickets, 3525 Menu - Invoice Preparation - Invoice Journal, 3650 Menu - Invoice Preparation - Add Invoice, 3651 Menu - Invoice Preparation - Edit Invoice, 3652 Menu - Invoice Preparation - Copy Invoice, 3653 Menu - Invoice Preparation - Credit Invoice, 3654 Menu - Invoice Preparation - Send Invoice, 3664 Menu - Invoice Preparation - View History, 3665 Menu - Invoice Preparation - Show Invoice Lines, 3663 Menu - Invoice Preparation - Edit Payment, 3520 Admin – Invoice Preparation.
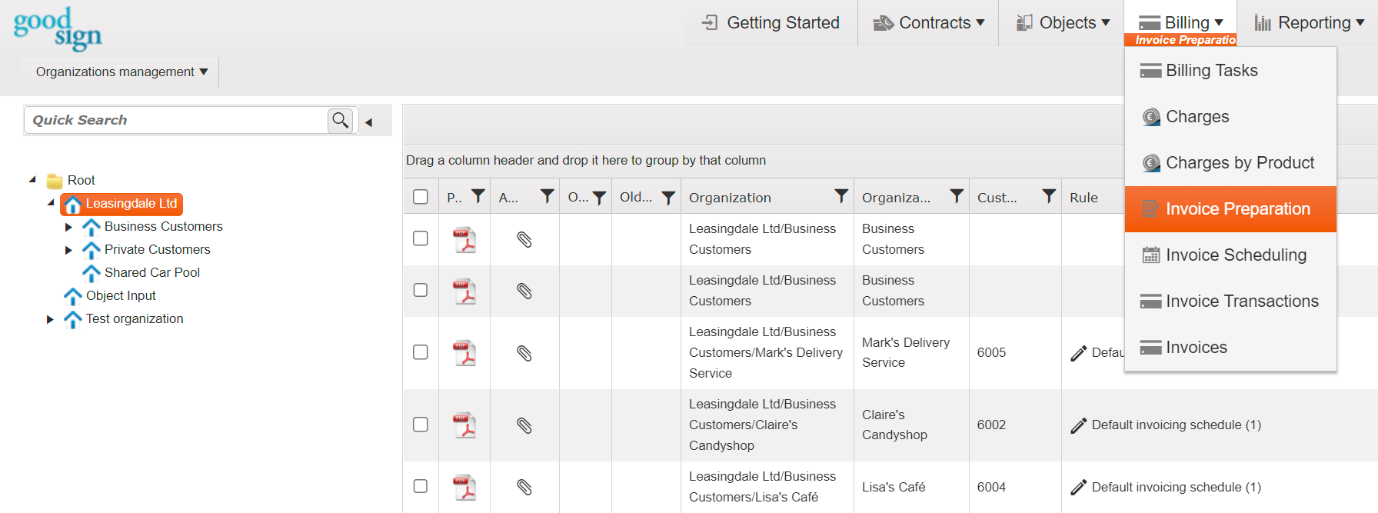
Invoice Preparation Dashboard
The Invoice Preparation dashboard can be found at Billing > Invoice Preparation. The dashboard contains plenty of information about invoices and you may wish to create a template of this information to your liking. To learn how to make custom templates, please view the Grid Management user guide.
Some important data that can be viewed in Invoice Preparation includes:
- Invoice Number – unique, sequential code that is systematically assigned to invoices. This is the official invoice number seen by customers etc.
- Status – indicates the invoice status e.g., new or sent
- Invoice Total
- Due Date
- Invoice Date
- Period Start & End date – referring to from which period the invoiceable services are from
- Document ID – Good Sign’s unique technical ID of the invoice
- Invoice Batch ID – All invoices generated by the same invoice schedule run have the same batch ID
Tip: Use the grid’s column sorting and filtering possibilities and save a template so you can use the view of your choice whenever needed.
Tip: Invoices per YTD – Far right the last field that shows the number of invoices sent to your customers year-to-date
The invoices are organized by organization in the Organization Tree, seen on the left. Once you’ve chosen the right level in the Organization Tree, you can choose an invoice. By clicking on the pen in the Rule section of an invoice, you can open Invoice Scheduling. There you can view the schedule that generated the particular invoice. This is mostly informative and should be edited with caution. We will discuss invoicing scheduling in detail in another user guide.

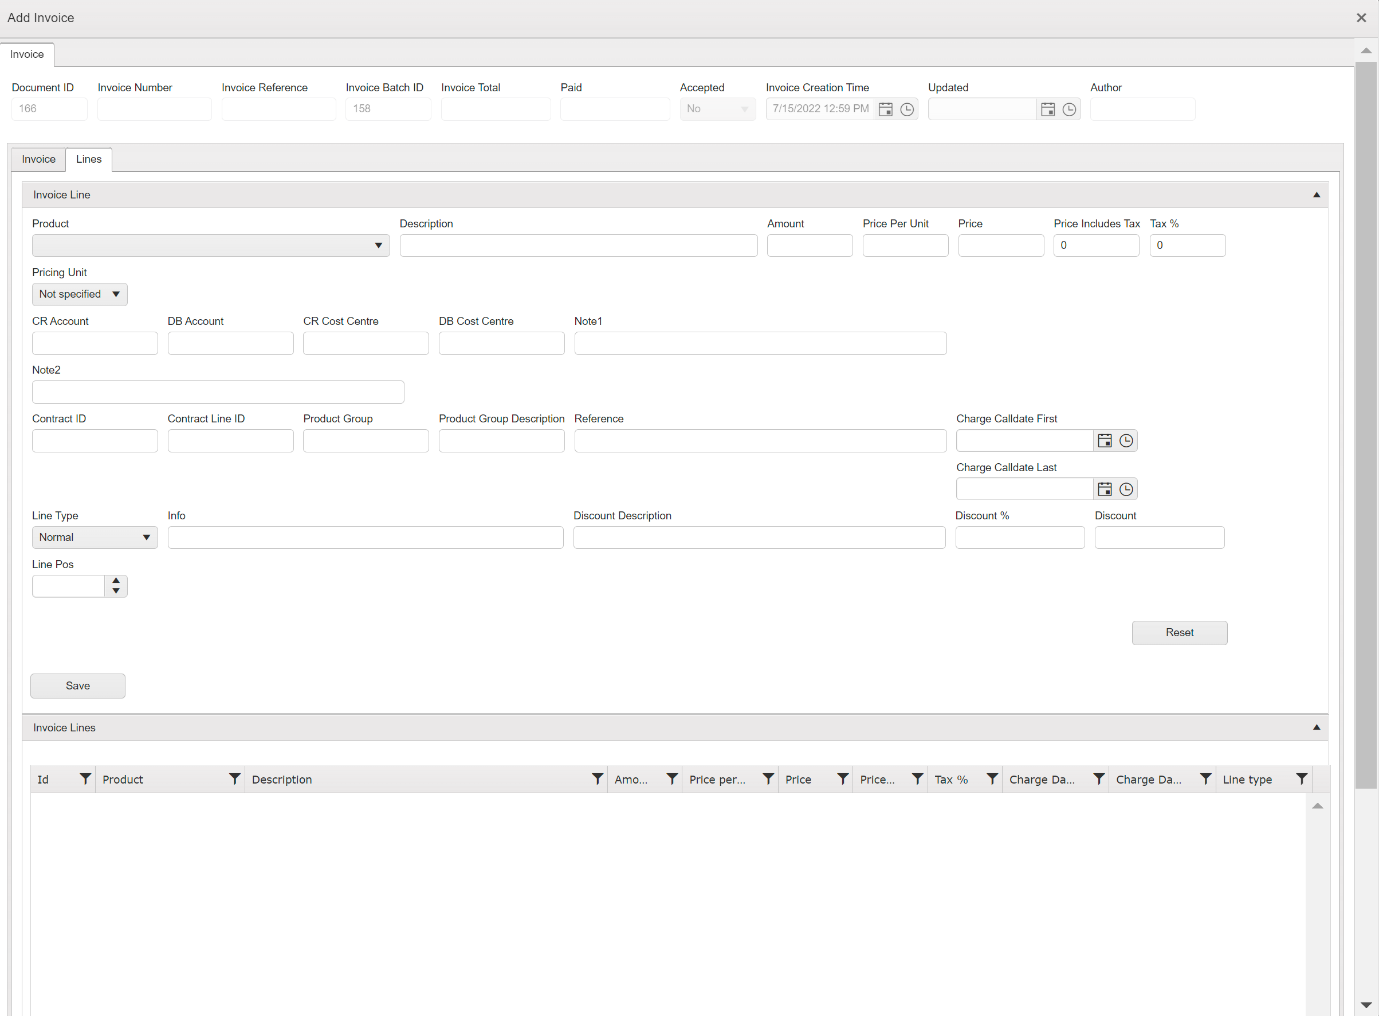
Add Invoice
If you need to manually create an invoice from scratch, you can do it via Add Invoice. To do this, follow these steps:
- Go to Billing > Invoice Preparation
- Choose the organization for which you are creating the invoice from the Organization Tree
- Choose Add Invoice from the Management menu
- Make sure you fill in all the parts marked with a red star, the rest of the parameters are optional
- When you are satisfied with your invoice, press Save
- The Lines tab appears, where you can add the invoice lines manually to the invoice
- Fill in at least Product, Amount, and Price Per Unit. The Tax % will be what has been declared as the default tax percentage.
- When you have added all the essential information, press Save
- To add more invoice lines, repeat steps 6-8 until you’re done
- Close the window
Note! If you wish to start over, press Reset
Edit Invoice
- Only invoices that haven’t been sent can be edited. Go to Billing > Invoice Preparation
- Choose the invoice you wish to edit
- Under the Management menu (see Figure 2), press Edit Invoice
- Make the desired changes to the invoice
- Press Save
- Close the window
Warning! It is possible to enable the editting of sent invoices with a specific user right 3520 Admin – Invoice Preparation. However, these are official documents and should be editted with extreme caution. This function enables the editing of invoices in sent/delivered status. With this functionality, one can modify some of the fields that normally would be locked in the Edit Invoice window.
Copy Invoice
Copy Invoice can be used i.e., when you’ve credited an invoice and need to raise a corrective invoice. You can copy the original invoice and make corrections, such as, correct a price that has been credited on a credit invoice. You can also copy an invoice to another organization or client. To copy an invoice:
- Go to Billing > Invoice Preparation
- Choose the invoice you wish to copy
- Choose Copy Invoice from the Management menu
- Check that you have the right organization
- Check the Invoice Period
- Press Copy
- Fill in all the invoice data, but at least the parts marked with a red star
- Press Save
- Close the window
Credit Invoice
A credit invoice is created based on an original invoice. When crediting a single invoice, a credit invoice is generated and opens for editing. The created credit invoice is then visible in Invoice Preparation and has to be sent like a normal invoice. If you wish to credit an invoice, you can do so in Billing > Invoice Preparation. Press the invoice you wish to credit and choose Credit Invoice from the Management menu. You can credit the entire invoice or just a part of it. In case you choose to credit the invoice only partially, delete the invoice lines you DO NOT wish to credit. Press Yes to confirm the event.
As default, an invoice can be credited only once. A credited invoice is marked as Credited. However, it is possible to edit the crediting rules so that an invoice can be credited multiple times without raising any errors.
Multi-Crediting
To generate multiple credit invoices simultaneously, choose all the invoices you wish to credit in Billing > Invoice Preparation. Then go to the Management menu and select Credit Invoices. You’ll then need to confirm the action by pressing Credit. Now, all the invoices you selected in the beginning have a credit invoice, that you can edit and send to the customer.
Send Invoice
If you wish to send an invoice, you can do so in Billing > Invoice Preparation. Press the invoice you want to send and choose Send Invoice from the Management menu.
Mass Sending Invoices
You can choose multiple invoices at a time and send them all at once. Choose the invoices you wish to send and select Send Invoices from the Management menu. Then press Send. Press Yes to confirm the event.
View History
View History shows you the all the changes that have happened to the invoice you have chosen. Just go to Billing > Invoice Preparation and choose View History from the Management menu. Once you’re done, press Close.
Show Invoice Lines
Show Invoice Lines shows you the details of each invoice line. Just go to Billing > Invoice Preparation, choose an invoice and choose Show Invoice Lines from the Management menu. Alternately, you can choose several invoices and view all of their invoice lines at once. This is handy when you i.e., wish to compare the invoice lines of two consecutive invoices.
Invoice Journal
You can view a summary, details, accounting, or full details list of invoices in Invoice Journal.
- Go to Billing > Invoice Preparation
- Choose Invoice Journal from the Management menu
- Choose the organization you wish to examine
- Decide the level of depth of the information
- Give a Start/End Date
- Press Search
If you wish to export information to Excel, press Export and choose the current page or all pages to be exported
Configured Functionalities
These functionalities can be seen in the invoice preparation dashboard only if they are configured there, they cannot be seen by default. The configured functionalities are:
- Send Reminder
- Resend Archive
- Resend Accounting
For Admins Only
In this chapter, there are functionalities that should be used by admins only.
Delete Invoice
Caution! Only for admins who understand the consequences!
Delete Invoice will remove the chosen invoice and invoice lines, but the charges on the invoice will still be set to that invoice. Therefore, Delete Invoice should only be used when the charges aren’t meant to be invoiced now or in the future. Delete Invoice can be used for a single invoice (one line selected from the invoice preparation grid) or multiple invoices at once (multiple lines selected).
Should you wish to use this feature, go to Billing > Invoice Preparation, choose the invoice you wish to delete, choose Delete Invoice from the Management menu, press Delete and confirm by pressing Yes.
To be able to use the operation, you’ll need the following user right: 3523 Menu - Invoice Preparation - Delete invoice.
Release Tickets
Caution! Only for admins who understand the consequences!
Release Tickets is also a function that should be used with caution. Release Tickets resets the invoicing status of the charges, so that they can be recreated or invoiced again. Often in these situations, the original invoice has been credited. This functionality does not remove the invoice, i.e., invoice header or invoice lines, and they remain visible in the grid of Invoice Preparation dashboard. If the aim is to remove invoice(s) entirely, one should first release tickets, and only after that delete invoice (see Delete Invoice).
Can be used for single invoice (one line selected from the Invoice Preparation grid) or multiple invoices at once (multiple lines selected).
To use Release Tickets, go to Billing > Invoice Preparation and choose the invoice you wish to release tickets from. From the Management menu, choose Release Tickets. Select the tickets you wish to release and press Release. Press Yes to confirm your choice.
To be able to use the operation, you’ll need the following user right: 3524 Menu - Invoice Preparation - Release Tickets.
Re-Open Invoices
Caution! Only for admins who understand the consequences!
This function allows user to turn invoices from sent/delivered status back to new status in Good Sign. This is an exceptional activity due to requiring understanding of how invoices are being processed afterwards, and may also, depending on the environment, require activities on invoice operator or AR/ledger side. Re-open invoices function can be used for single invoice (one line selected from the Invoice Preparation grid) or multiple invoices at once (multiple lines selected).
To be able to use the operation, you’ll need the following user right: 3657 Menu - Invoice Preparation – Re-Open Invoices.