What Are Organizations and How to Use Them
This guide is about organizations and how to use them. After reading this guide, you'll be able to understand the basics behind organizations and how to make logical organizational structures.
Required User Rights
To use the properties mentioned in this user guide, you need to have at least the following user rights: 3530 Menu – Organizations, 2304 Button - Find Organization, 2315 Add Organization, 2316 Edit Organization, 2317 Delete Organization.
Organizations & The Organization Tree
Organizations are a specific type of object in Good Sign. Typically, organizations in Good Sign represent legal entities such as, customers, suppliers, partners etc. Technically, organizations in the Good Sign Organization Tree can also represent "hierarchy levels" that are relevant in controlling your business. They could be used for example for separation of Domestic and Export customers, or Governmental and Private. This can be used for setting up pricing, and other settings you wish to share within the Organization Tree branch. This way, one type of organization can be a synthetic level that is used to share properties to all its suborganizations.
Organizations are recognized by their org_id, organization name and organization tree. All organizations have a unique org_id. Organizations can also contain users, which represent users of your services, enabling more granular control when such is needed. Organizations can be viewed in the system in the Organization Tree or Administration menu > Organizations.
- The Organizations dashboard can be found under the Administration menu
- Organizations can be generally seen in the Organization Tree/Administration menu à Organizations (name may vary in different customer instances). Depending on the setup the dashboard list may also vary.
The Organization Tree is visible in most dashboards and is a native way to filter the data you see.
Benefits of a Well-Organized Organization Tree
With wise designing of the Organization Tree, you get the most out of the inheritance of settings and features between organizations. This saves a lot of time in maintenance and saves you from tons of unnecessary input errors. Each setting for inheritance can also be controlled, so you can decide if some setting is used for child organizations or not. User rights are also based on the structure of the Organization Tree.
How to Create an Organization Tree
Before you start creating organizations, think about the way they should be grouped. What are the main drivers that define how they are invoiced. I.e.:
- Organizations who share pricing
- Do you have distinct places with the same invoicing, such as countries or continents
- Do you have different currencies in use in your invoicing
- Do you have private or governmental customers
- Anything else that could form a group of organizations
Whenever a new organization is created it will become a parent organization or child organization, depending on its location in the Organization Tree.
Organizations can be created manually. In this kind of scenario, you first create a main organization and then create sub organizations if needed.
Organization can also be created automatically using an interface, but this would depend entirely on the setup of your environment.
The Organization Dashboard
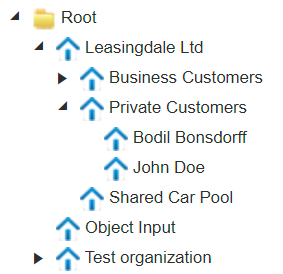
To view current, create new, edit existing or delete old organizations, you need to navigate to dashboard: Administration à Organization (OR any other dashboard that shows the Organization Tree on the left). This particular dashboard allows you to view all organizations in the system, including the deleted ones. If the deleted column has the value 1, the organization has been deleted. Note that you will only see the organization that is selected in the Organization Tree and all organizations under it on the dashboard. On the left you will see the Organization Tree, which might look something like Figure 1. By selecting an organization and opening it from the arrow to the left, you can see all the suborganizations under it. For example, if from the tree above, I click on Private Customers, I would see it and two sub organizations on the dashboard to the right.
Creating a New Organization
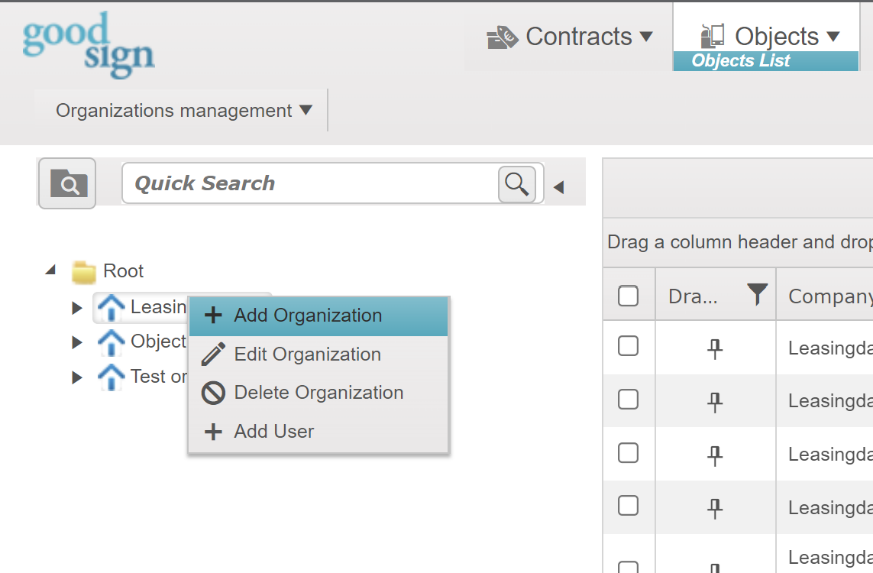
To create a new organization, select the parent organization you wish to create an organization under. Then right-click on that organization and click Add Organization. Fill in the information you want to have registered about the organization.
It can be useful to add the following fields:
- Organization Name (technically the only mandatory field required)
- Business ID
- VAT ID
- Invoice Email (if using email invoicing)
- Street Address or Invoicing Street Address
- Invoicing Account (if using e-Invoice/eBill)
- Invoicing Operator (if using e-Invoice/eBill)
When all the useful information has been filled, press Save. Confirm by pressing Yes.
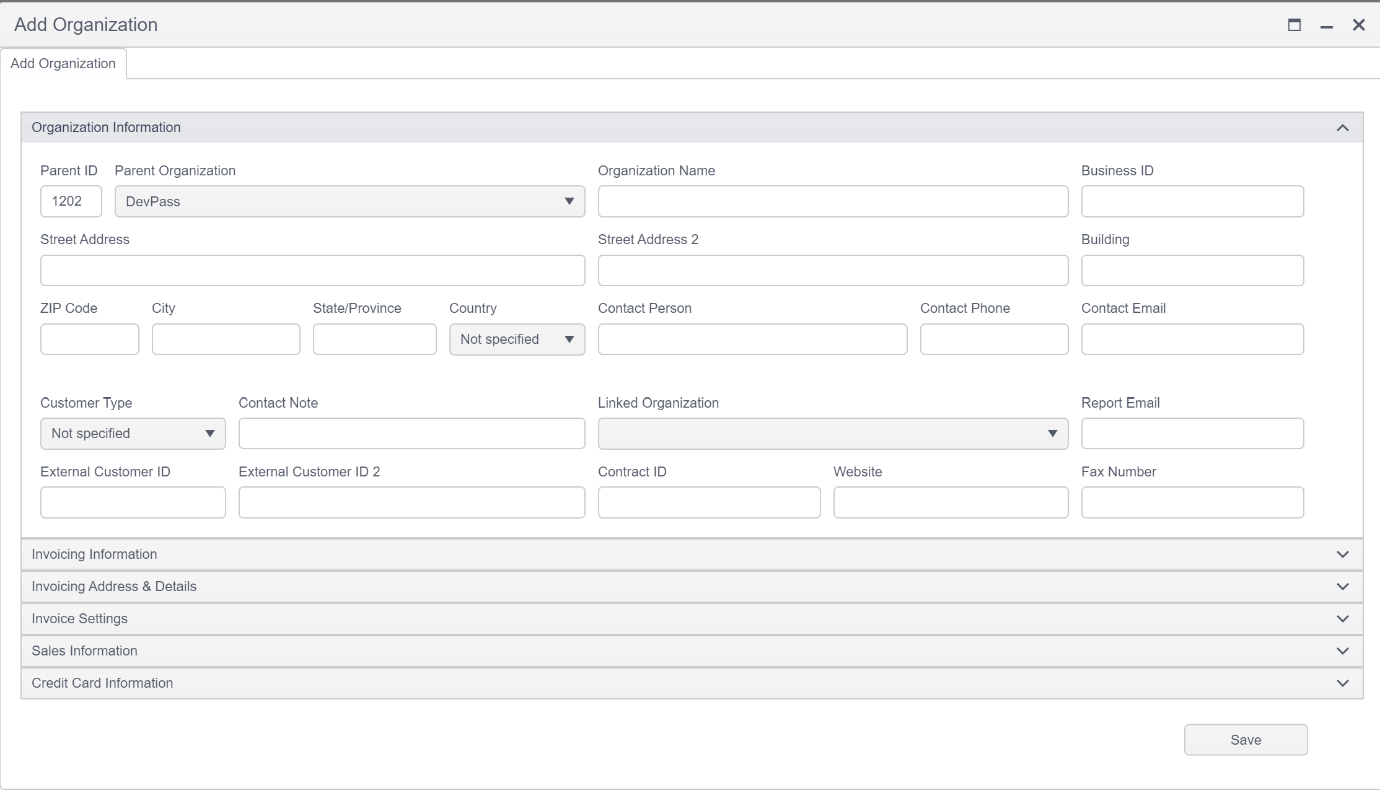
Caution! Pay close attention that you have the right Parent Organization
Editing an Organization
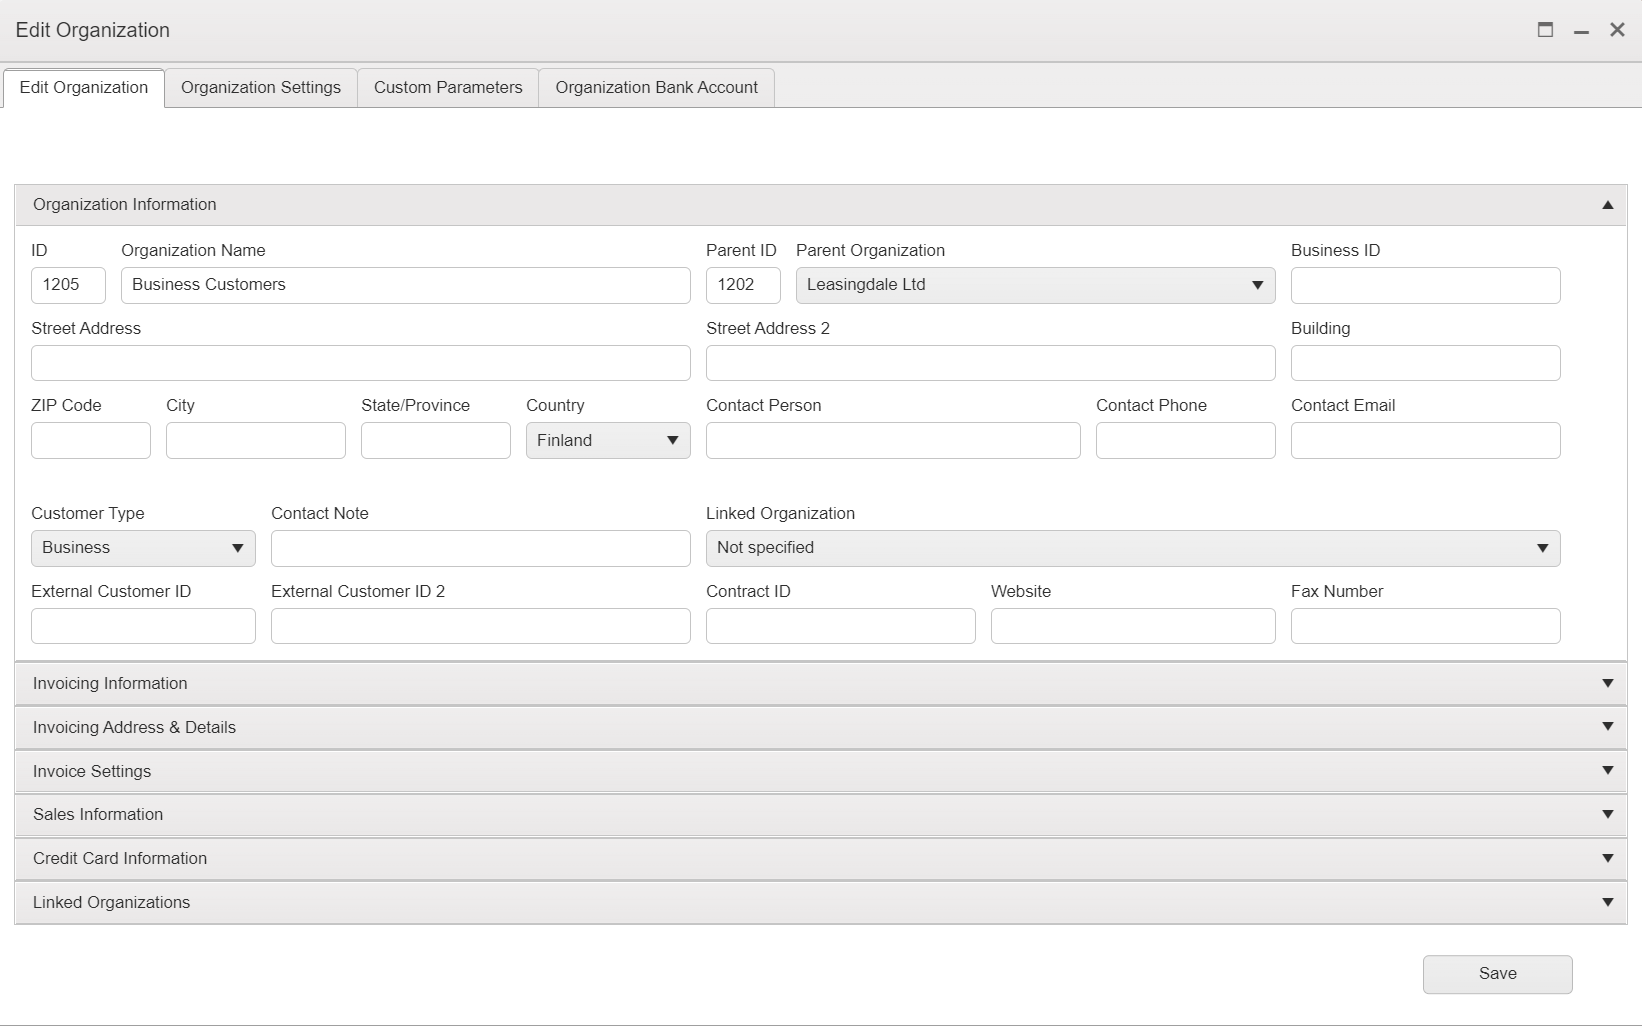
Changes to an organization’s information are required generally in cases where an organization’s address, parent organization or some other information needs to be changed. To edit an organization, right-click on the organization’s name in the Organization Tree and choose Edit Organization. In the Edit Organization window (see Figure 4), change the values that require updating, and then click on Save.
Caution! You can’t update the (organization) ID (this is a unique ID created in organization creation and it remains the same for the organization’s entire life cycle)
Deleting an Organization
To delete an organization, select the organization from the Organization Tree e.g., Leasingdales Ltd/Private Customer/John Doe. Open the menu by right clicking and select Delete Organization. You can do this any time the organization tree is visible.
Caution! Always verify that the organization doesn’t have active users, suborganizations, charges or price lists before removing the organization
After clicking on Remove, a confirmation question appears. Once you have confirmed, if all goes well, you will see a success notification. Deletion updates organization information and marks it deleted as seen in above. Please note that after deletion, the organization is still visible in the Administration > Organizations main grid, because it also lists deleted organizations.
Edit Organization
When you select an organization from the Organization Tree, right-click and press Edit Organization, you’ll see all the information there is about an organization.
Edit Organization contains several sections: Organization Information, Invoicing Information, Invoicing Address & Details, Invoice Settings, Sales Information, Credit Card Information and Linked Organizations.
Caution! When you create or edit the values always remember to press Save. In the event of a successful save you will see a green success notification and, if an error occurs, a red error notification with information about the error will be shown
Organization Information
This section contains general information about the organization.
Invoicing information
The Invoice Name is for giving an alternate name for the organization, which is shown on the invoice.
Invoicing Address & Details
If you select i.e., eBill as Invoice Type you should also enter the Invoice Account and Invoice Operators information.
If the invoicing address is different than the organization address, enter the information in this section.
Caution! If you fill in Street1, remember to fill in all the other address details too. This will be the default address information for invoicing.
Invoice Settings
It is possible to do different configurations based on the Payment Period being used. The Payment Term specifies the due date of the invoice. Invoice Date + Payment Term -> Due Date. Usually this is set by the seller organization or by the customer. If you need an exception for Invoicing Default VAT%, it can be set here. I.e., if you want to set a 0% tax category to a foreign company, you can specify it here. The setting is inherited from the seller organization, but you can set an exception value, if necessary, for example for a foreign customer (VAT 0%). Overdue Interest is inherited from the seller organization. Invoicing Language lets you choose the language of the invoice. No Sale means is additional sales permitted or not. No Reminders denies the sending of reminders in cases where e.g., reclamation is open. Generally, it’s used for blocking reminders, but it can be configured specifically for other purposes. No Collects can be configured specifically for other purposes. No Invoicing prevents invoicing. Fees (tickets) will be marked as invoiced, but the invoice will not get an invoice number and will not be forwarded even if an attempt is made to send it. When Consolidated Company is set to YES (INVOICING_SKIP_CONSOLIDATED_COMPANY is set to 1 in settings) invoicing is kept on hold.
Sales Information
Reference Prefix allows the use of a specific prefix for invoice numbers.
Note! Defined for the seller company only. Other fields in this section can be configured for customer specific purposes.
Credit Card Information
Credit card information can be stored here. These fields are used if the credit card payment method is implemented.
Linked Organizations
In the Linked Organizations section, you can see the organizations, whose invoicing is linked to this organization's invoicing. The Linked Organization defines the exact organization, who will be the final invoiced party. When you link organization A to organization B, all organization A’s charges are invoiced from organization B.
Note! The default is that a separate invoice is generated for each organization. Invoices from organizations can be combined using the Linked Organization specification.
Organization Settings
Requires user right: 2380 Organization Settings Management. In the Organization Settings tab, you can add or edit organization settings. Settings are inherited from top organization or can be set individually to the organization.
To create a new organization setting in Organization Settings, the Setting Name is mandatory. When the necessary fields are filled press Save. If everything went fine, you’ll see the success notification. If there was an error to save setting you would see a red error notification.
Custom Parameters
Requires user right: 2390 Organization Custom Parameters. Here you can set up i.e., CRM account parameters.
Numpac Info
Meant for teleoperators, requires user right: 2360 Numpac Organization Info. This information is required, when numbers are moved from one operator to another, to automate the process.
Landline Ranges
Meant for teleoperators, requires user right: 2350 Phonenumber Ranges management. Used for the automatic activation of landline accounts, bookkeeping of what numbers have been allocated (VOIP, fax, etc.). The landline range information detects and allocates numbers, allowing the possibility for only activated numbers to be saved.
Phonenumber Ranges
Meant for teleoperators, requires user right: 2350 Phonenumber Ranges management. Tells which mobile number pools have been given to an organization. When a subscription is activated, this information will be used to determine, which numbers can be allocated for that particular sim.
Organization Bank Account
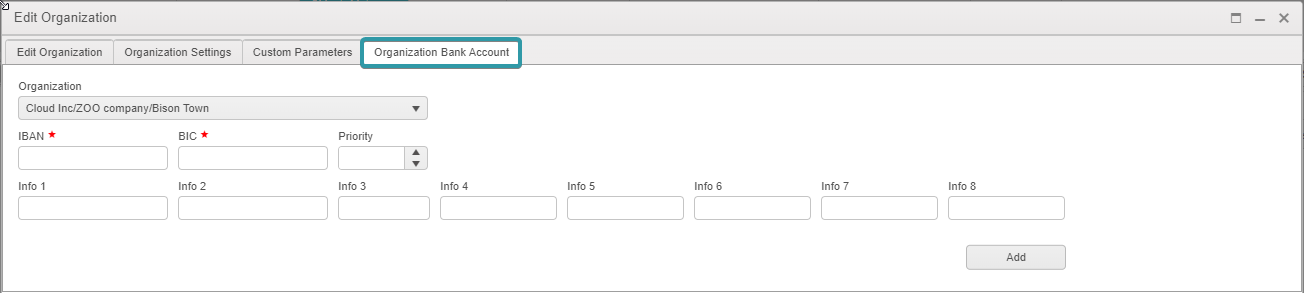
Requires the user right: 2370 Organization Bank Account Management. The seller organization’s and the customer organization’s bank accounts can be set here. For the seller organization, a bank account is mandatory.
Price List
Requires user right: 2396 Price List. An organization can be used as a price list, which can be used for other organizations, so that an organizations pricing is not following the default based on organization tree. Instead, pricing can be looked up from a separately defined organization. That organization could be, for example, a synthetic price list organization. It can tell the start/end times for domestic, international and roaming services and who they have been assigned to.
Warning! We recommend that you consult Good Sign before using this functionality.